Saturday, October 19, 2013

Mackers! or the Scottish Play

This is a post almost a year late but here we go.


Saint Andrew's Theatre class settled on Macbeth as their play this past year. We went with a female Macbeth and while I'm biased I think it was a pretty darn good production, especially for high schoolers tackling Shakespeare for the first time. It was as presentable as any other production I've seen.

Given the nature of the play and the background of war my design and our concept was a timeless un-ending war. Mixing current and past military uniforms, and styles. The main structure was essentially a pile of junk, with meant to reflect a once great building that has been ravaged by war, who's inhabitants have patched and barricaded using anything they can find creating a patchwork defense.

The audience was again on stage with overflow into the house seats, keeping this in mind I added a temporary thrust stage on top of the stairs leading down the stage. The floor design was a little more abstract but was meant to reflect the two warring houses and the points of their swords, which meet in the middle in a metaphorical battlefield. The circle also became a point of importance and power where the witches met, with a focal point for certain effects.

It was an interesting experience and my stage was covered in drops and smears of fake blood at the end of the show (which by the way "bleeds" through paint). We also got hit by a snowstorm the day we were supposed to open so things were cancelled and rescheduled but eventually it went off without a hitch.

Look for a short sub-post about how I went about creating branches for the soldiers to bring forward as Birnam Wood approached.


An in-progress shot, before the floor and some details were finished.


Thursday, October 17, 2013

Making Semi-Custom Blades on the Cheap

This is a project I've had on a burner (not the back one, but not the front one) for awhile now. I had seen tutorials on various sites and always intended to tackle it but never had the time. Well I've finally started it. Back in the day a company by the name of Cold Steel (most famous for their ridiculous product videos, See below) Made a machete blade that cost around $12. They've now discontinued it, which threw the first wrench into the plan. I made the choice to buy one of their other machetes for about $17 and change the design a little. These blades, are cheap, covered in a black coating, and have a junky plastic handle, BUT they are tempered and heat treated properly which means they have potential.


My first step was to take a grinder and cut of the handle without damaging the tang. This is harder now than it used to be when they were making rubber handles. Be sure you have good ventilation and maybe even a mask because if you use a grinder the plastic doesn't cut as much as it just melts.

Step two was to take some charcoal and draw out the shape of the two blades I was going to cut down. I marked it out, took the grinder with a cut off wheel and got to work chopping the long 21" blade into a small dagger and seax style small blade. It wasn't a perfect fit but they worked out alright. The downside to the coldsteel blades is just how thin they are, not much real meat to them.


Step three was taking my orbital sander and getting the black coating off. This was the easiest part to do. A little elbow grease and some repetition with a coarse grit paper did most of the work. So I was left with two bare blades ready for rehilting.

This is about the point where I had a long break since life got hectic, but I started carving and shaping the new handle out of Red Oak. I cut the basic shape with my jigsaw (a scroll saw would be great for this) and then started working it with the bench grinder and sand paper. It was a bit bulky so I thinned one side down using the table saw. I unfortunately ran it through backwards and cut too thin, so the blade will be offset. Not what I intended but it will make a nice pair for the dagger as a side blade on a main scabbard so I decided I could live with it.


They Fight! Peter Pan Edition, Also- They Build

Another summer post!
Heather's summer camp season for the YMCA included both Bye Bye Birdie and Peter Pan. This meant more work on my end helping out, though I only had a small hand in Birdie. An hour or so in photoshop gave her an Elvis style poster starring her lead. The interesting part is that the picture we had to work with only showed one arm, so I had to clone the good one, meaning he's got two right arms. I don't think anybody could tell. Then a nice parent took it to work and printed it on a giant sheet of foam board, pretty nice for not a lot of work.


For Peter Pan I made Heather 8 rehearsal cubes, 2 large windows, a base for a sonotube mast, and then helped walk through how to make a few other pieces. I spent a day cutting out panels at her branch and then took them back to my shop to assemble. By the end of the day (probably 4 hours of work) I finally had all 48 panels cut, was covered in caked on sawdust (it was raining) and had a nose full of junk too (should have had on a dust mask). I also made a hook for Hook out of a $12 hay bale hook and some leather.

 If you were ever curious how much stuff you can cram into a Prius C, here's your answer. 2 tool bags, a bunch of clamps, a sword box, a table saw, 2 drills, a router, a circular saw, box of screws and a few other things. This is AFTER I'd taken a bunch of stuff out.


The fight choreography was interesting for this show. I did all the choreography and had one day of instruction with the kids (which only was about an hour of work) and Heather did all the actual running of the fight, troubleshooting, training and fight calls. I wish I could have been more hands on but I was too heavy into my own summer work to be there. So when I finally saw it again was the night I saw the show. It needed a little more polish for sure and the night I was there they bobbled a couple of times, BUT for middle schoolers with only a week or so of training, they did a pretty good job. I'm always critical but for two young kids completely new to sword fighting they definitely put up something presentable.
Full set with the rope ladder and mast in place
The windows unfinished. These were flown in for the house scenes at the start and end of the show. They ended up stained a golden brown.
 I took this chance to build a lockbox for on site storage. The big sword is my Hanwei hand and a half sword. We did not use this. The other one however is an Amfence blade, we had 3 of these for the show.
My shop on assembly day, this was the easiest part of the job. Glue, staple, flip, staple, move on. 


The Pirates of Penzance on Treasure Island

It was a busy season at the ACTSA Summer camps this year. We had our usual camp classes and small shows but this year we took on The Pirates of Penzance as our musical which is no easy task for children under the age of 14. Our Tour took us out and about with an adaptation of Treasure Island with music added by our wonderful director, Laura Minadeo. Needless to say, we had a bit of a pirate theme. When everything was finished, we had done Pirates, Treasure Island, Macbeth, When the Mountain Meets the Moon, Rats, and a few junior classes as well.

For Pirates, we really needed a universal style set because it was going to serve as set for every other camp production. Normally that's not a big deal but we also had a rock musical called 
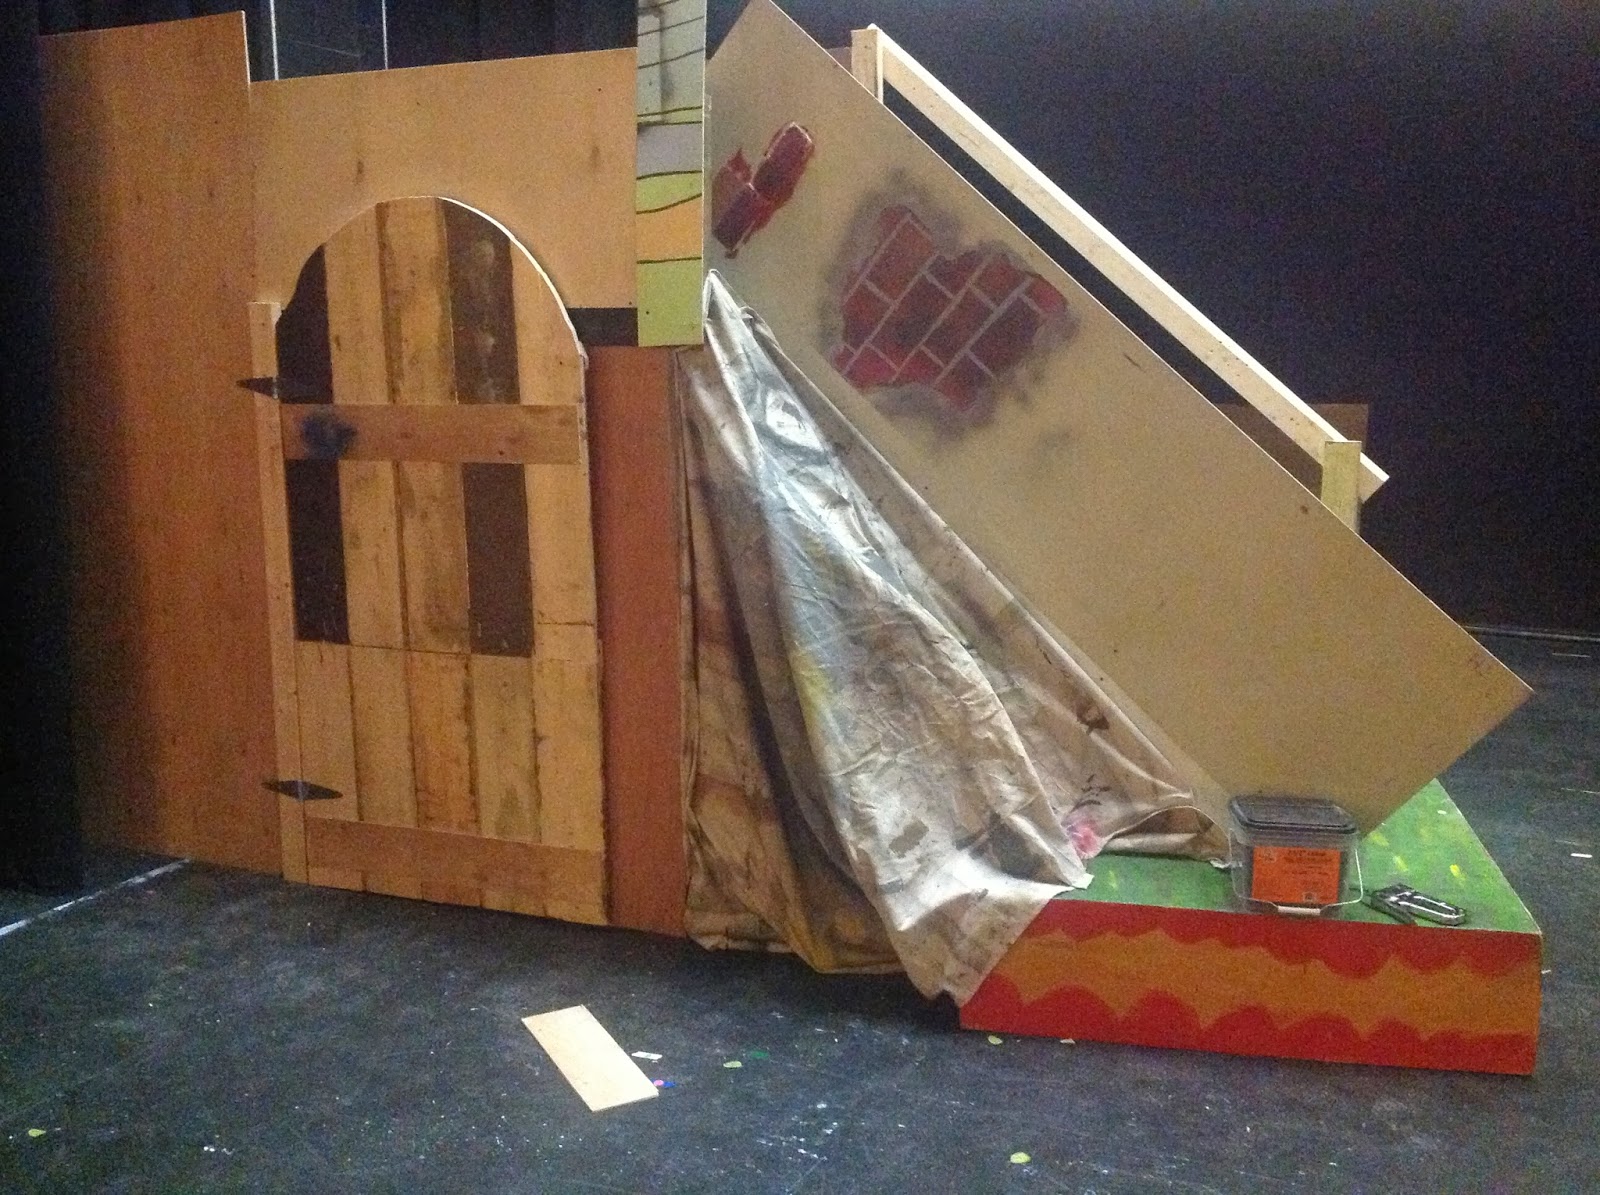
Rats, written composed and directed by David Tessier. Luckily it fit his needs as well. Stage right was just a 4x8 tower with stairs which was supposed to be cave like. Given my lack of time and help I decided to create a rock face with some 2x4 scraps and a drop cloth stapled onto it all and then painted. Certainly not perfect but I think it looked alright.

Stage left was a bunch of 4x4 platforms and scrap pieces from the shop combined to make ruins. I didn't spend much time on this at all since I still had some foam bricks and half walls sitting around. Throw a couple of painted flags into the mix and a silhouette of the Queen of England and I was just about done.


We also had just replaced all the cyc gel, which made for some awesome color, though after doing the math, to replace all 3 colors for all the fixtures cost $140. ouch. But oh boy was it worth it


Our Tour had to pack into a short school bus and we decided on keeping the layout the same as our last tour since the support pieces were all there already. I swapped out for a new backdrop, which I'm pretty happy with, but as always wish I had a bit more time for, framed by palm trees. The disaster piece that I hated and didn't have time to do anything about was the side tall landing boat flat, it was just done quick and ugly and I was less than pleased with how it turned out.


Balancing the stage out we had a magic treasure chest which I built from the ground up, far larger than I had intended. I got going and about half way up I realized how huge it was going to be, but it was all made from scrap material and I didn't have enough to start over so I went on with it. The chest turned out pretty well though and I was definitely happy with the end results. The chest stayed on stage the whole show and contained all the props that were needed. It clearly held no treasure, but that's where the magic came from.The lid had a built in shelf that was was held in place by two handles so when it was time for the big reveal, they closed the lid, pulled the pins, and when it opened had a pile of treasure sitting on top which was worth all the hassle if only for the crowd reactions when it happened.
Here's how the chest worked. This was my test run
Projection speeds things up greatly. I took my rough sketch, 
made a transparency and went to work. 
Drop in progress
 Almost finished
 Pirates tower, in process
 Before painting SL, some of it was usable without any work
A dowel rod, piece of linen and some paint and I've got a flag.


A post of Backlogs and busy-ness

I realize that my last post was about an eventual update, which never came. I have a literal backlog of things going on right now. Heavy into construction for our production of Grease. One of these nights I will in fact write out posts and get them published. Since the last update I've added a few projects which are in limbo due to my schedule, but they include;
-modifying a cheap cold steel blade into a small seax and dagger
-various Grease projects
-Going to the Ohio Renfest and talking briefly with Guido Crescendo, also known as David Woolley
-Buying a car, a Valiant Armory blade and a Starfire dirk, not sure which one I enjoyed more haha.

These are coming, with pictures, and will satisfy the couple of people that actually check my blog occasionally, if they even still do.